Design for Recycler BPM Calibration Acnet Page
Marc W. Mengel
Abstract
This paper describes the current design for the Acnet Console application
which will manage BPM Calibration for the Recycler Ring at Fermilab. This
document provides a initial description of the intended usage of the
software, and an overview of how the software is broken into modules. It
should assist other people in understanding the software. It will be
updated as design work completes, and as implementation progresses.
Intended Usage
Functionality
The BPM Calibration Application will allow users to:
-
initiate calibration tests on one, several, or all BPMs on one,
several, or all control "houses" in the Recycler Ring.
-
select from one or several intensity levels and waveforms of
calibration signal.
-
abort such tests if they feel it is taking too long
-
view test results in a fasion which lets them quickly identify problem
BPMs.
-
review history of, and adjust value of, calibration parameters for
BPMs.
Screens
Currently, the application is envisioned as proceeding through 4
screens:
-
A setup screen that lets the user select:
-
Houses, (and BPMS within those houses??) to calibrate [default all
in all]
-
Calibration Intensity Levels [default all]
-
Calibration Waveforms to use [default all]
and lets them start the calibration
-
A progress screen, which shows the progress of calibration on
the various houses as we step through the various intensities and
waveforms
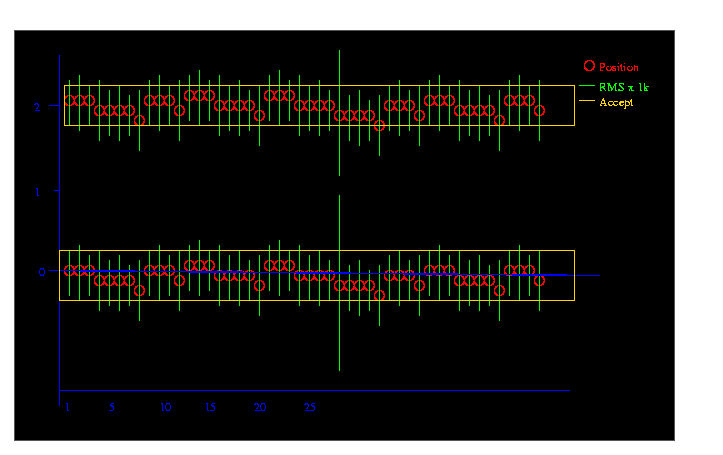
-
A results screen which shows a graph of average and RMS
positions read back from various BPMs, and lets the user select a BPM
for the adjustment screen; and has a "Adjust All Outliers"
button (with an R U sure popup) to adjust all out of tolerance BPMs to
a recommended calibration value.
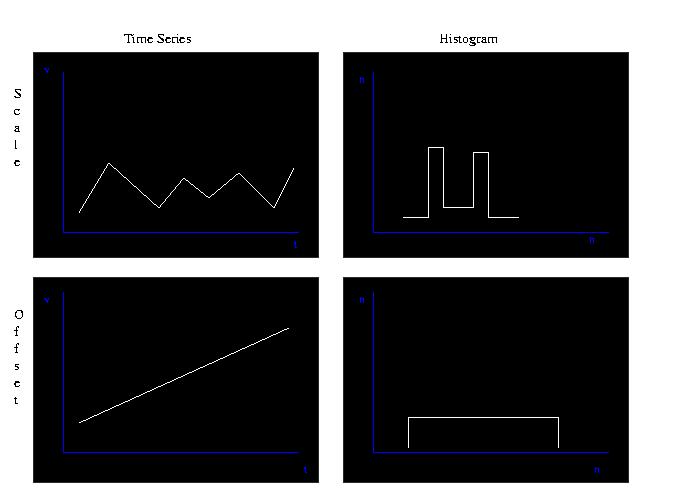
-
The adjustment screen, which shows a history of past calibration
values for this BPM as a time plot and histogram, provides recommended
new values for calibration parameters (which may be "ignore this BPM"),
and allows the user to pick values (default the recommended ones) and
set the calibration parameters for the BPM to those values.
The normal usage would start at the setup screen, pause at the
progress screen as calibration sets are made, and then move on to
the results screen, where various trips to the adjustment
screen and back would be made. The thorough user would then go back to the
Setup screen, re-run the calibration, and review how the new values worked
on the results screen.
Initial setup for a given housefull of BPMs could be made by the "Adjust
All Outliers" button on the results page.
Architecture of the software
The code will be organized into a few small modules of one source file
each:
-
a hardware module which will do all of the ACNET communication
with the BPM house ACNET nodes. This module will initialy be stubbed
out with routines that provide fake data for testing.
-
a state module which will keep track of what screen the user is
on, and how far through the calibration process we are.
-
a module for each of the 4 screens (setup, progress, results,
adjustment), which will draw that screen on the users display
console.
-
a history module which will track the calibration history of the
various BPMs in a database
-
a main module, which will house the main Console application
event loop, and update the state module as events come in, which
will in turn aks the appropriate screen module to update the console
display.
The subroutine call interfaces for these modules will be described in
more detail in the following sections.
The hardware module
The hardware module will be in file "hw.c", and have interface
subroutines:
-
int hw_init();
-
Initialize hardware interfaces (i.e dio init/lock routines)
-
int hw_trm();
-
shutdown hardware interfaces (i.e dio close/unlock routines)
-
int start_signal_generator(int house, int beam_type, int ratio);
-
turn on the calibration signal generator in a given house generating a
given beam type, and with A:B ratio given (currently only 1:1 or 2:1)
-
int stop_signal_generator(int house, int beam_type);
-
turn off calibration signal generator (must always be called
before leaving application!)
-
int start_data_collection(int house, int beam_type);
-
tell the front end to begin collecting closed-orbit data for the given
beam_type.
-
int check_data_ready(int house, int beam_type);
-
see if started data collection has finished.
-
int collect_data(int house, int raw, int *pn_bpms, float *pos, float
*rms);
-
retrieve collected data into arrays. This actually sums the values into
the array; they will be divided by the number of sampling runs at the
end of the data collection before graphing.
The state module
In order to allow calibration to be done in bite-sized bits, while
polling for user requests to abort, etc; main flow of control of the
application will be buried in a state machine, with each event from the
event loop allowing us to tick forward a state at a time.
This module will receive event notifications from the main module,
and will refer the appropriate event to the current screen
module's update() call, or other internal subroutine calls, as indicated
on the state transfer edges in the diagram below. Each such subroutine
will return a result of either:
-
0 == stay in this state
-
1 == move to "next" state
-
-1 == revert to setup screen
-
-3 == revert to adjust screen
The state diagram (with nested sub-state diagrams indicated with
dashed lines) looks like: 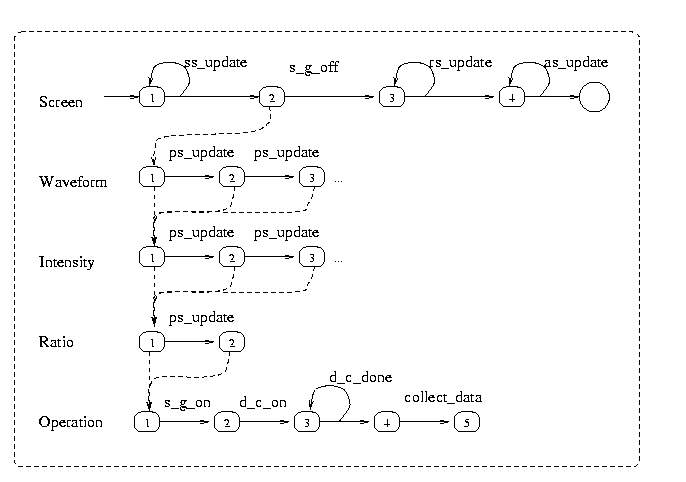
-
int st_update(int wid,int type,int row,int col,int info)
-
update appropriate screen with new event.
-
s_g_on()
-
Turn on signal generator for current waveform, intensity, etc. in all
selected houses.
-
d_c_on()
-
Turn on data collection in all selected houses.
-
d_c_done()
-
Check if data collection is done in all selected houses, or if we have
timed out.
-
collect_data()
-
collect raw and adjusted data for all selected houses
-
s_g_off()
-
turn off signal generator in all houses
The state module will also hold the data read back from the
calibration data collection in arrays:
    float st_pos[]; float st_rms[], st_pos_raw[], st_rms_raw[];
    int n_samples;
The setup screen module
This module will deal with the setup screen, which should look
something like:
			    BPM Calibration Setup

   +-Coverage==========+   +-Intensities=======+   +-Beam Simulation==+
   |[x] All BPMs       |   |[x] Low (0.1V)     |   |[x] un-bunched    |
   |[ ] Houses:___-___ |   |[x] Med (0.5V)     |   |[x] 2.5MHz        |
   |[ ] BPMs:____-____ |   |[x] High(0.9V)     |   |[x] 7.0MHz        |
   +===================+   +===================+   +==================+

			    [Start Calibration]

   +-Messages=========================================================+
   |                                                                  |
   |                                                                  |
   |                                                                  |
   |                                                                  |
   +==================================================================+
-
ss_draw();
-
draw the setup screen
-
ss_update(int type,int row,int col,int info)
-
handle an event from the main loop. This will consist of one of:
-
accepting specific house/bpm ranges (or "all")
-
accepting specific intensity ranges (or "all")
-
accepting specific beam type ranges (or "all")
-
moving to the progress screen
The progress screen module
			   BPM Calibration Progress

	  +-Progress==============================================+
	  |XXXXXXXXXX                                             |
	  +=======================================================+

			       [ Abort ]

			  Intensity: 0.3v
			      Ratio: 2
			   Waveform: unbunched

   +-Messages=========================================================+
   |                                                                  |
   |                                                                  |
   |                                                                  |
   |                                                                  |
   +==================================================================+
-
ps_draw();
-
draw the progress screen
-
ps_update(int type,int row,int col,int info)
-
handle an event from the main loop. This will consist of:
-
updating progress bar, and current waveform, ratio, and intensity
-
aborting if the user has requested it.
The results screen module
                            BPM Calibration Results
         [Return to Setup]                          [Adjust All Outliers]

   +-Display====+=============+                 +-Selected-+================+
   |[ ] Raw     |[x] Position |                 |BPM: 37   |  R   Pos RMS   |
   |[X] Adjusted|[ ] Intensity|                 |          | 1:1  0.3 0.003 |
   +============+=============+                 | [Adjust] | 2:1  2.3 0.002 |
                                                +==========+================+

   +-Messages=========================================================+
   |                                                                  |
   |                                                                  |
   |                                                                  |
   |                                                                  |
   +==================================================================+
+-Messages=========================================================+
| |
| |
| |
| |
+==================================================================+
-
rs_draw();
-
draw the results screen
-
rs_update(int type,int row,int col,int info)
-
handle an event from the main loop. This will consist of either
-
selecting a BPM as current, and updating the text parameters box.
-
transferring to the adjustment screen for the current BPM
-
adjusting all BPMs with the "Adjust All" button
-
hopping back to the setup screen at user request ("Setup") button.
The adjustment screen module
This module should present a screen like:
			   BPM Calibration Adjustment

	 [Return to Setup]                          [Return to Results]


				 Scale    Offset
       [ ] Historical Average    0.0025   0.0020
       [ ] Latest Reccomendation 0.0030   0.0020
       [ ] Custom Value          ______   _______

			[Adjust Calibration]

   +-Messages=========================================================+
   |                                                                  |
   |                                                                  |
   |                                                                  |
   |                                                                  |
   +==================================================================+
Scale Offset
[ ] Historical Average 0.0025 0.0020
[ ] Latest Reccomendation 0.0030 0.0020
[ ] Custom Value ______ _______
[Adjust Calibration]
+-Messages=========================================================+
| |
| |
| |
| |
+==================================================================+
-
as_draw();
-
draw the adjustment screen
-
as_update(int type,int row,int col,int info)
-
handle an event from the main loop. This will consist of either
-
accepting a new parameter value
-
adjusting this BPM by calling the history module
-
hopping back to the result screen at user request.
The history module
This module will help us track history of calibration of BPMs.
-
hs_fetch(int maxbpms; int &nbpms, float *shifts, float *scales);
-
Get current calibration params for BPMs
-
hs_history(int bpm, int max, int &n, float *shifts, float *scales,
long *dates);
-
Get historical calibration params for a given BPM.
-
hs_adjust(int bpm, float shift, float scale);
-
Set new shift and scale value for the given BPM.
-
hs_forget_before(int bpm, long date);
-
Remove entries older than date from history for a given
BPM.
The main module
This consists pretty much of the main() subroutine, which will call
the routines to initialize the hardware, call the state machine repeatedly,
then clean up.>